Onboarding to NICeMail Services
The following onboarding guide elaborates and enumerates the process and steps involved in the onboarding of users to the new NICeMail services. You can access the new email solution using the email address migrated to the new email platform.
Steps involved in accessing the new NICeMail services
- You can start accessing your accounts in the new NICeMail Services once you receive the Migration Completed email and SMS from the Service Provider.
- Please note that after receiving the migration completion email, any actions (Read/Unread/Delete/Move emails to other folders) performed on the old email platform will not be reflected on the new platform, and vice versa.
The steps involved in logging into the new email solution encapsulate the following steps:
- Logging in to the new NICeMail Services
- Update your User Profile information
- View your Migration Dashboard
- Enrolling your mobile device via MDM
- Device enrollment procedure for Android devices
- Device enrollment procedure for Apple devices
- Configuration of Gov OneAuth for MFA
- Accessing Gov Mail
Logging in to the New NICeMail Services
Once you register, follow the steps given below to log in to your NICeMail services account:
- Go to your browser and enter https://mail.gov.in/.
- In the NICeMail Services log-in page, enter your Email address and select Next.
- Enter your existing email account password.
Click Sign In.
Note
If you face issues during the sign-in process, you can reach out to your department's Delegated Administrator for assistance. If you're not sure who your DA is, click Contact Delegated Admin on the sign-in page. Learn more.
You will receive an OTP as an SMS to your registered mobile number as part of the Two-factor Authentication.
- By default, SMS will be set as the Multi-Factor Authentication (MFA) mode for the first-time log-in. Once you log in to your account, you will be prompted to enrol your mobile device via MDM to access the mobile applications.
- On successful enrollment, the Gov OneAuth application will be installed on your mobile which will be used as an MFA method for future sign-ins.
- Enter the OTP and click Next to proceed.
- You will be asked to reset your password to set a new password for your account. This new password shall be used for all your future sign-in to your new NICeMail services account.
Once you log in, you can view your last 10 login details in a pop-up window.
If you find any of the log-in sessions to be suspicious, please inform your Delegated Administrator immediately.
- Click Continue.
The Data Migration—User Dashboard pop-up window will appear, providing details about the email migration status and including a note indicating that all emails dated before the specified date will be moved to GovDrive.
Data Migration User Dashboard
The Data Migration User Dashboard provides an overview of your email migration progress, displaying the status of both successfully migrated folders and those that failed to migrate. To access the Data Migration Dashboard, follow the steps mentioned below:
- Once you have logged into your account, navigate to the Workplace Dashboard by clicking the Home icon in the header.

- The Migration Status widget will appear, showing a summary of completed and failed email migrations.
- Click on the View all option on the top right corner of the widget to access detailed migration information.
- A detailed view will display the status of both successful and failed email migrations, along with the migration status.
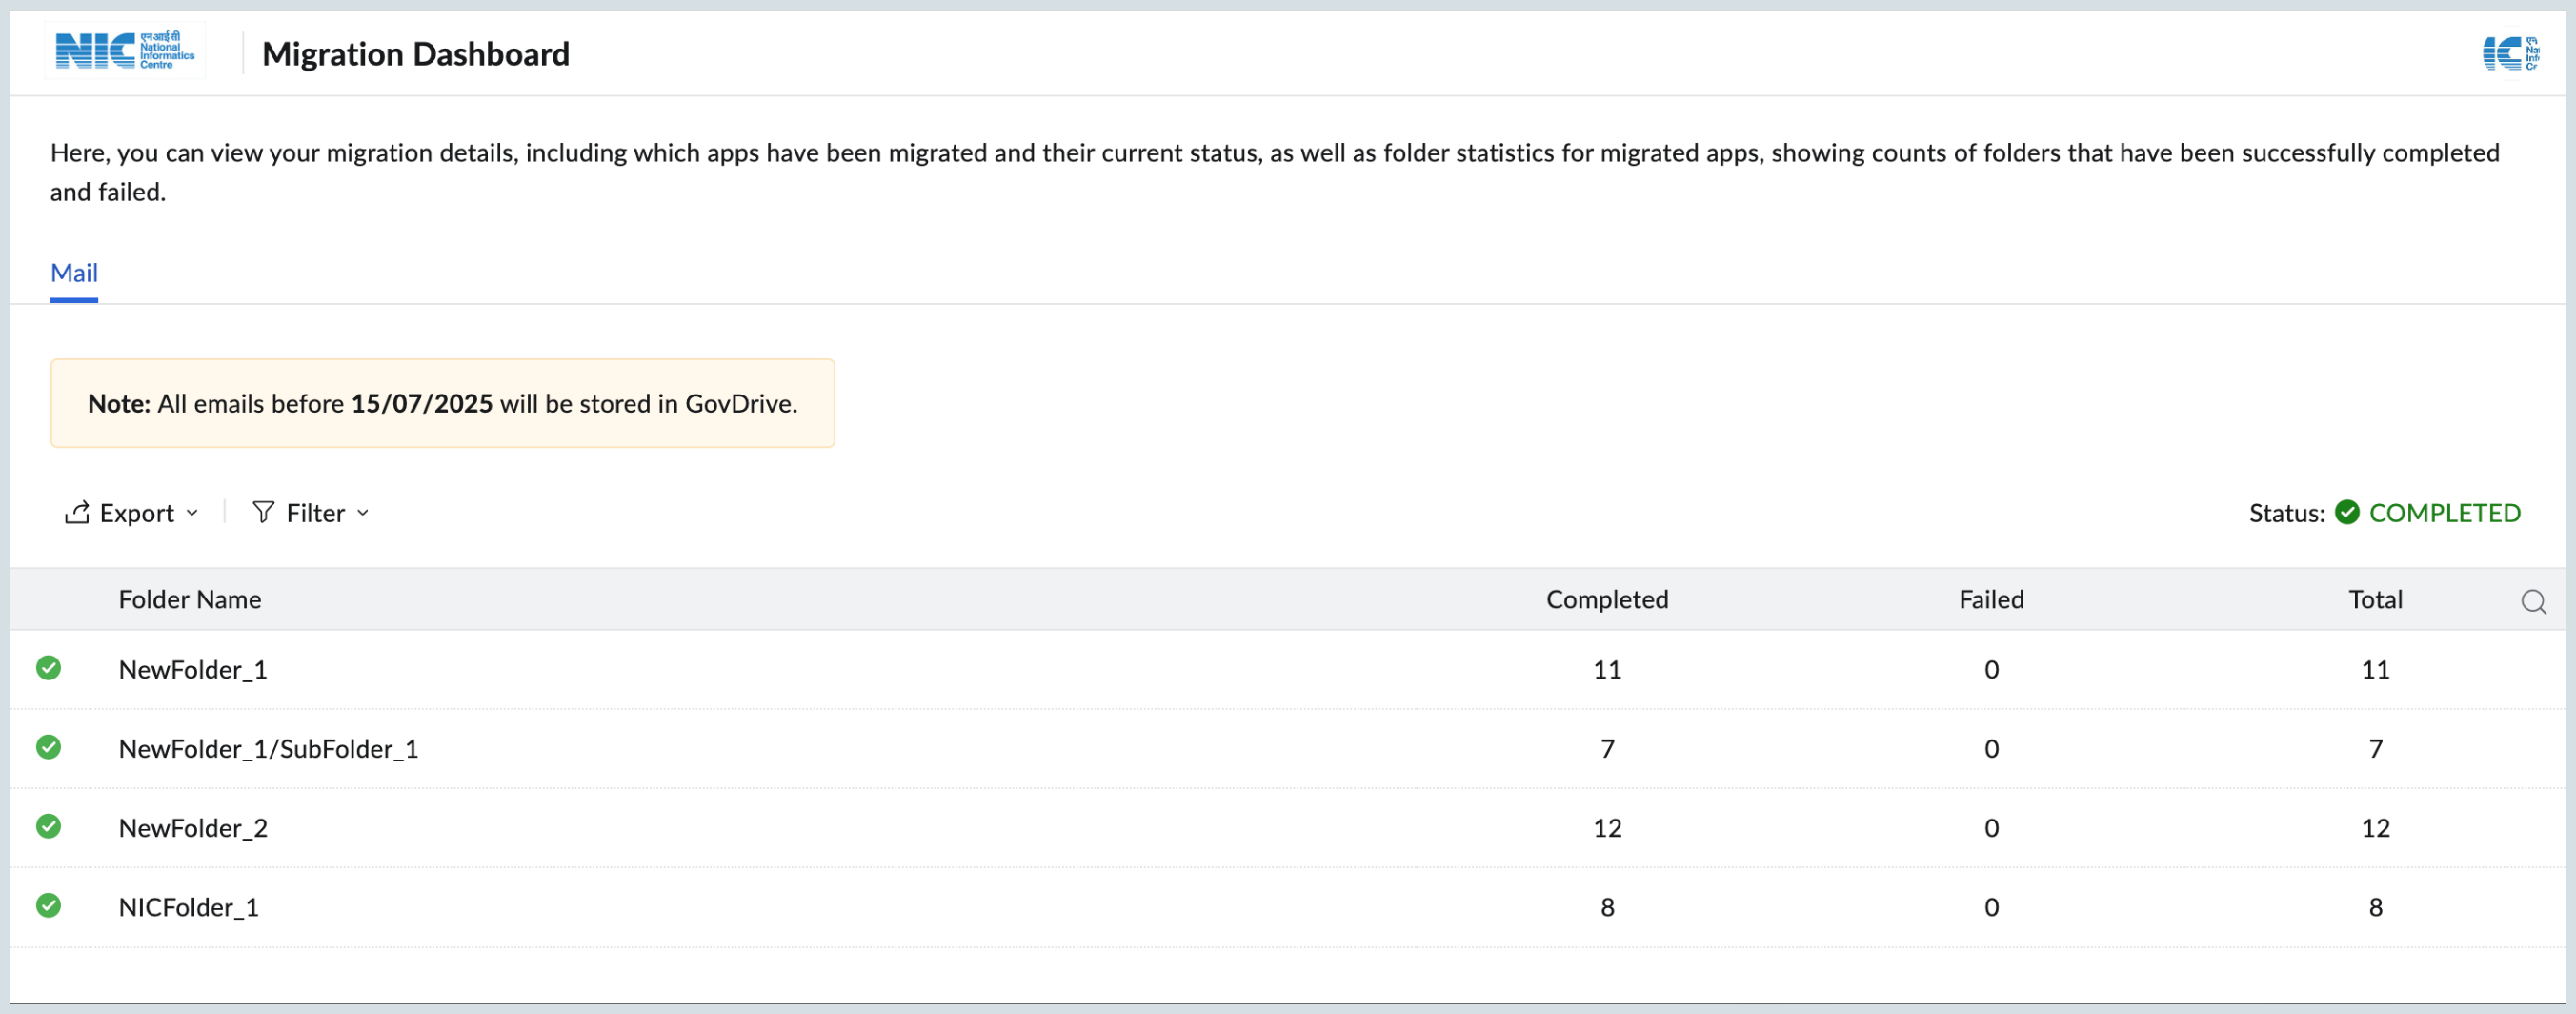
- You can also choose to export migration data by selecting one of the following options:
- Entire list
- Email type summary
- Entire summary

- To refine your view, you can filter the migration data by:
- Failed emails
- Failed folders
- Email type
- Mail account
- GovDrive

Update your User Profile Information
The Work Profile Information form is to be filled to update the Mailbox type, Parent and Present Office locations, Employee ID, and Designation.
The Profile Update form with a Skip option will be available for 15 days after it being enabled for your department/ ministry/ organisation. After 15 days, filling out the form will be made mandatory, and you cannot access your mailbox without filling and submitting the form.
The following information are non-editable:
- First Name/ Last Name
- Mobile Number
Choose the appropriate values from the drop-downs provided for:
- Relationship of email user/applicant with email-using Ministry/ Department/ Organisation
- Whether member of the All India Service or Central Service or Central Secretariat Services?
- Categories of Organisations
- Government Ministry/ Department/ Department-equivalent concerned
- Sub-categories of Organisations under Central/ State Government Organisation
- Identification number or Employee Code given by Parent organisation
- Designation
- State
- City/ Town
- Pincode
Please ensure to fill out the correct details before you submit. Once submitted, you'll not be able to make changes to the Work Profile Data.
- To make any changes, a request shall be raised to the Delegated Administrators of your department.
- If you find any data to be missing in the form, reach out to the Delegated Administrator of your department for further assistance.
Enrolling your mobile device via MDM
- Once you submit the updated profile information form and log in to your account, a QR code will be displayed to enroll your mobile device via MDM.
- Enrollment of your mobile device is mandatory to access the NICeMail Services mobile applications such as Gov OneAuth, Gov Mail and other applications distributed to users via the NIC App Stores for Android and Apple. Learn more.
For all official apps installed via Mobile Device Management (MDM), it is mandatory that you enter your biometrics or device PIN code every time you access the app. This security measure ensures that your mobile device and sensitive information remain protected.
How to enroll your Android device in MDM?
- The enrolling device must be running Android OS version 6.0 or later versions.
- Android devices come in various models and brands such as Samsung, Panasonic, Vivo, Motorola, Lenovo, Oppo, OnePlus, and more.
- However, some device models are tested and recommended for official use where work data is secure. They are termed as Android Enterprise Recommended devices. You can check if your device model is listed here.
- It is strongly recommended to use one of these device models to enroll and access Gov Mail and official apps.
Follow the below steps to complete device enrollment on Android devices:
- Download the ManageEngine MDM App from the Google Play Store.
- On your work laptop/desktop browser,
- Log in to https://mail.gov.in/ and click your profile picture in the top right corner.
- Go to Mobile Apps and click the Android button to view the QR Code for enrolling Android devices.
- Open the ManageEngine MDM app downloaded onto your device.
- Click Scan QR Code to enroll your Device.
- Click Proceed and follow the onscreen instructions to set up your work profile.
- Wait till your work profile gets created. You will receive a notification about enrollment completion.
Once the enrollment is finished, Gov Mail and Gov OneAuth apps will be installed automatically. If not, you can manually download the Gov Mail, Gov One Auth and other desired apps from the App Catalogue downloaded in your device. You can access the downloaded apps in your phone's work profile section.
How to enroll your Apple(iOS) devices in MDM?
- All iPhone and iPad device models with any of the following minimum OS versions:
- iOS 7.0 and above
- iPadOS 13.0 and above
- Note that iPad devices can run either iOS or iPadOS depending on the device model.
- You can check your device OS version using the following steps: Open Settings -> General -> About. You can see the iOS or iPadOS version number here.
Follow the below steps to complete self-enrollment on iOS devices:
- On your work laptop/desktop browser,
- Log in to https://mail.gov.in/ and click your profile picture in the top right corner.
- Go to Mobile Apps and click the iPhone button to view the QR Code for enrolling iOS devices.
- Open the camera app on your iPhone and scan this QR code to start enrolling the device. Make sure to open the link in Safari browser.
- Click Download profile to download a configuration profile and click Allow when prompted.
- Once the profile is downloaded, open the settings app on your device and select the downloaded MDM profile at the top of the settings listing.
- If you can't find it, navigate to the Settings > General > VPN & Device Management section in your device and select the downloaded profile.
- Click Install in the installed profile page.
- When prompted, Do you trust this profile's source to enroll your Iphone into remote management?, click Trust.
Your device is now successfully enrolled. You will automatically receive prompts to install Gov Mail and Gov OneAuth apps. If not, you can manually download the Gov Mail, Gov One Auth and other desired apps from the App Catalogue downloaded in your device. All the installed apps will be available in your mobile's apps section.
Configuration of Gov OneAuth for MFA
Gov OneAuth is automatically installed on your mobile device on successful enrollment of your device via MDM. Follow the steps given below to configure MFA using Gov OneAuth:
- Go to your browser and enter https://mail.gov.in/.
- Enter your email address and select Next.
- Enter the Password.
- Next, you will receive an SMS with OTP on your registered mobile number.
- Enter the OTP to authenticate the login.
- The browser page with steps to set up MFA using Gov OneAuth will be displayed.
- Open the Gov OneAuth Application on your mobile and select Sign In.
- Enter your NICeMail address and password in the mobile login window and authenticate the login using SMS OTP.
- In the next screen, select Enable MFA to configure MFA in the Gov OneAuth app.
- Click View OTP on the mobile screen to view the Time-based One Time Password (TOTP).
- Enter this OTP in your laptop or desktop browser to authenticate the browser session.
- Now, MFA will be enabled for your account.
- Next, you'll be prompted to set up backup codes for your NICeMail services account on the laptop or desktop browser screen. Generating backup codes is strongly recommended to avoid getting locked out of your account in case you lose your mobile device or lose access to Gov OneAuth in some way.
- Click Generate under Backup verification codes. Your backup codes will be generated successfully. Download and save those codes securely.
- By default, Time-based OTP is enabled as the MFA mode for the account in Gov OneAuth.
- You can select according to your preference from the options available:
- QR code- You'll receive a QR code on your webpage to scan with your smartphone.
- Time-based OTP(TOTP) - You'll receive a one-time password (OTP) on your smartphone, which needs to be entered on the webpage to verify your identity.
The next time you log in to your NICeMail Services account, you will authenticate using your chosen method via the Gov OneAuth application, providing an extra layer of security.
Accessing Gov Mail
Gov Mail is automatically installed on your mobile device upon successful enrollment via MDM. Follow the steps below to log in to the Gov Mail app:
- Open the Gov Mail app downloaded onto your device.
- Enter your email address and select Next.
- Enter the account password.
- Authenticate using the SMS OTP received on your registered mobile number or via one of the MFA methods configured in Gov OneAuth to log in.
You have now successfully logged into your Gov Mail account.
Know your Delegated Administrator
Your Delegated Administrator (DA) is responsible for handling key updates related to your account. If you need to perform any of the following actions, please contact your Delegated Administrator to obtain their approval:
- Updating your registered mobile number(s)
- Updating or extending your email account expiry date
- Updating your retirement date
- Correcting profile/personal information
- Resetting your password
- Activating or deactivating email account(s)
- Creating new email account(s)
- Deleting email account(s)
- Viewing and exporting the user list
- Approving email account transfer to another department/ministry.
- Adding multiple accounts to your Gov Mail app.
If you don’t know who your DA is, here’s how you can find out:
During Sign-in
If you encounter issues while signing in and require assistance, you may need to contact your DA. Follow these steps to check who your DA is:
- Go to your browser and enter https://mail.gov.in/.
- On the sign in page, click on Know your DA.
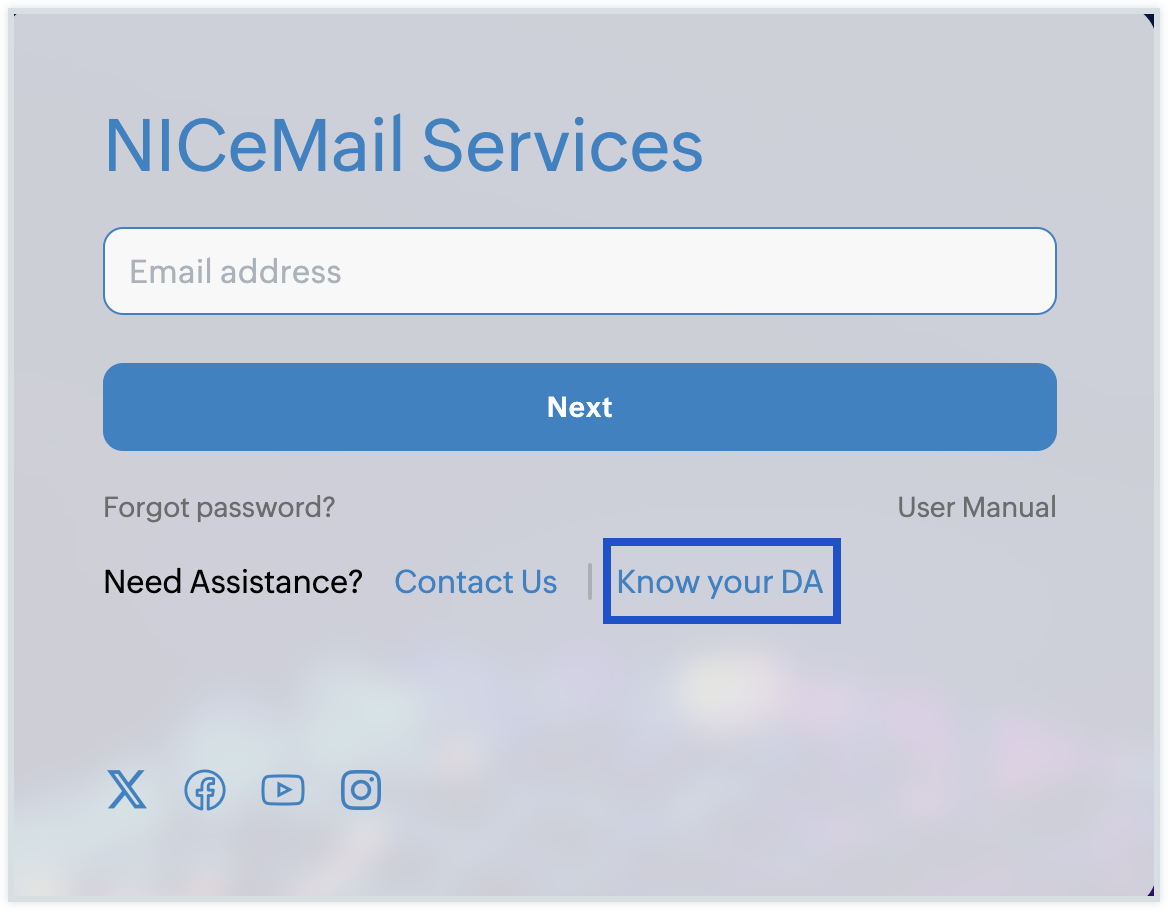
- Enter your email address and recovery mobile number.
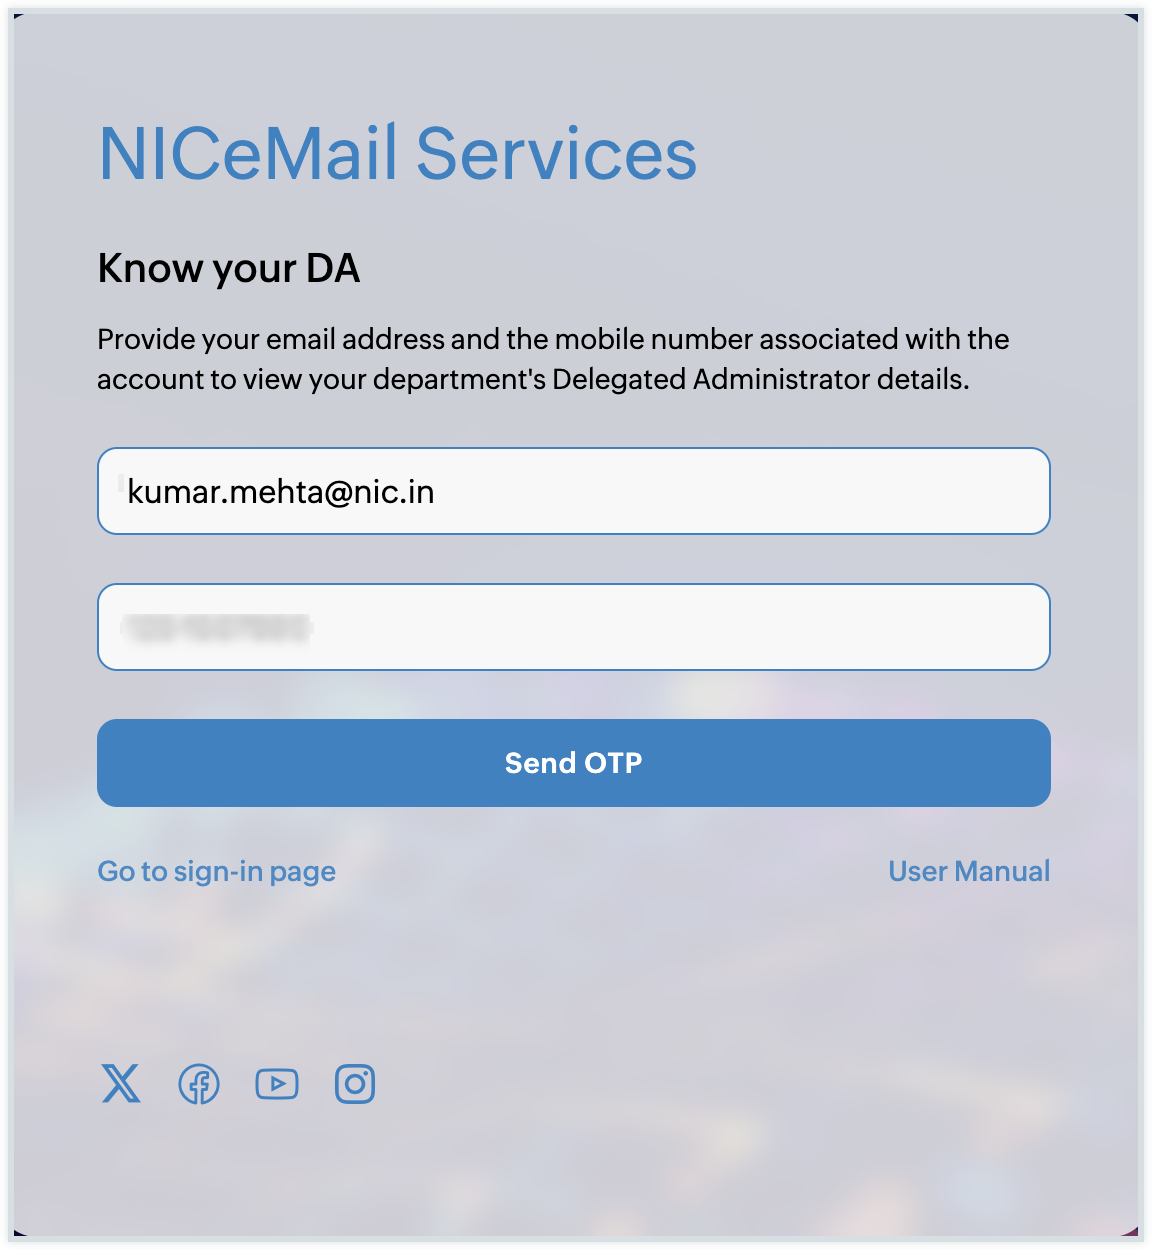
- Click Send OTP and verify your account.
- Upon verification, a list of your department’s Delegated Administrators (DAs) and their contact details will be displayed.
Note
If you're unsure about your recovery mobile number or the Delegated Administrator of your department, please contact NICeMail Services Help Desk for assistance.
While updating your Work Profile
If you need to update your work profile details but are unsure who your DA is, you can find this information on the Profile Update page. Simply hover over the View Delegated Administrators button at the top of the page to see a list of DAs assigned to your department. Once you have identified your DA, you can contact them separately for any necessary profile updates.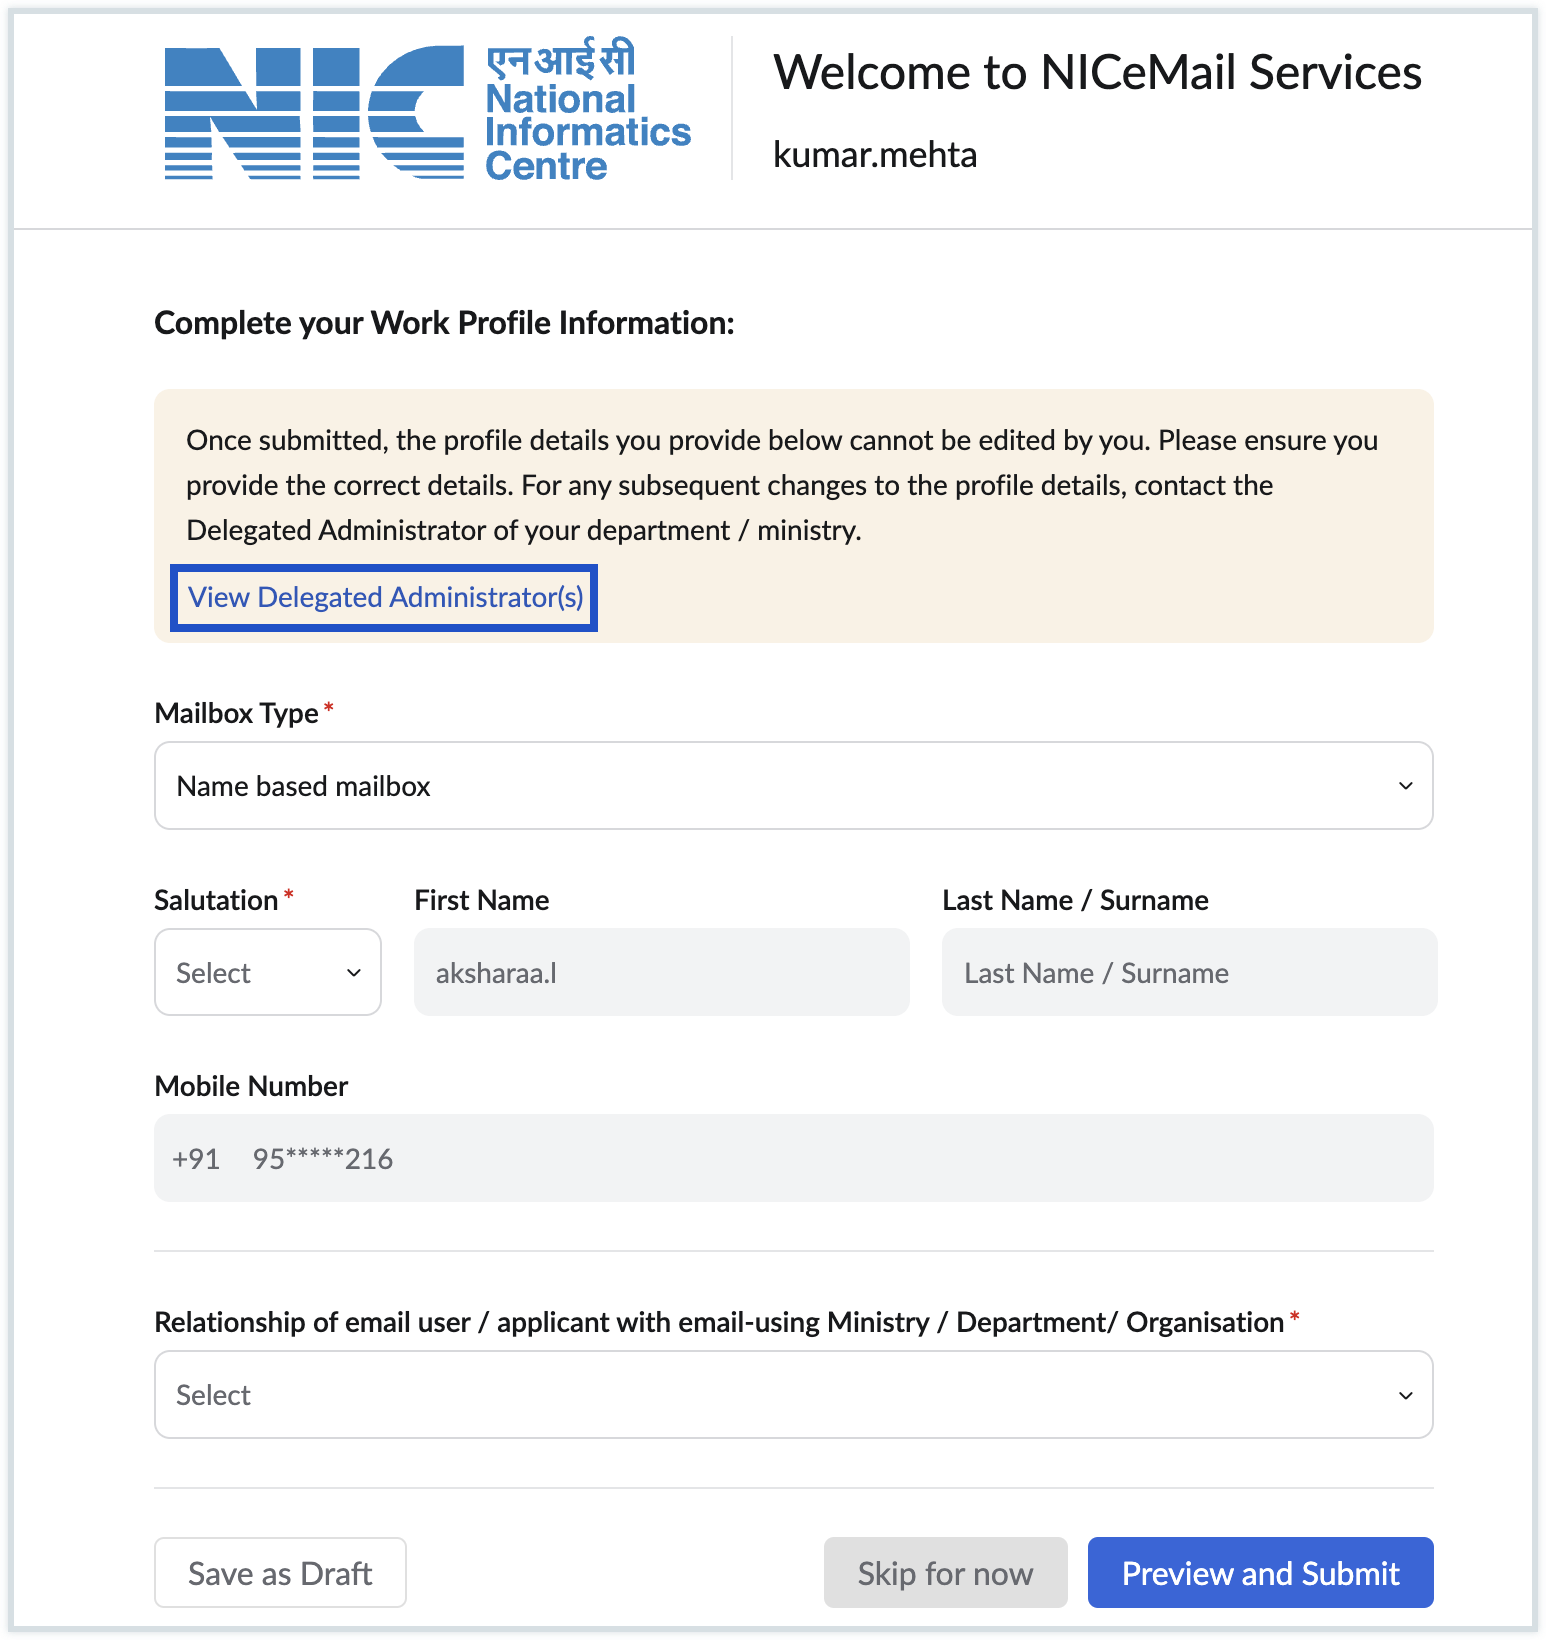
Within the NICeMail services interface
You can also find your DA’s details directly within the NICeMail services interface:
- Login to https://mail.gov.in/.
- Click the Contact your DA button at the top-right corner of your screen.
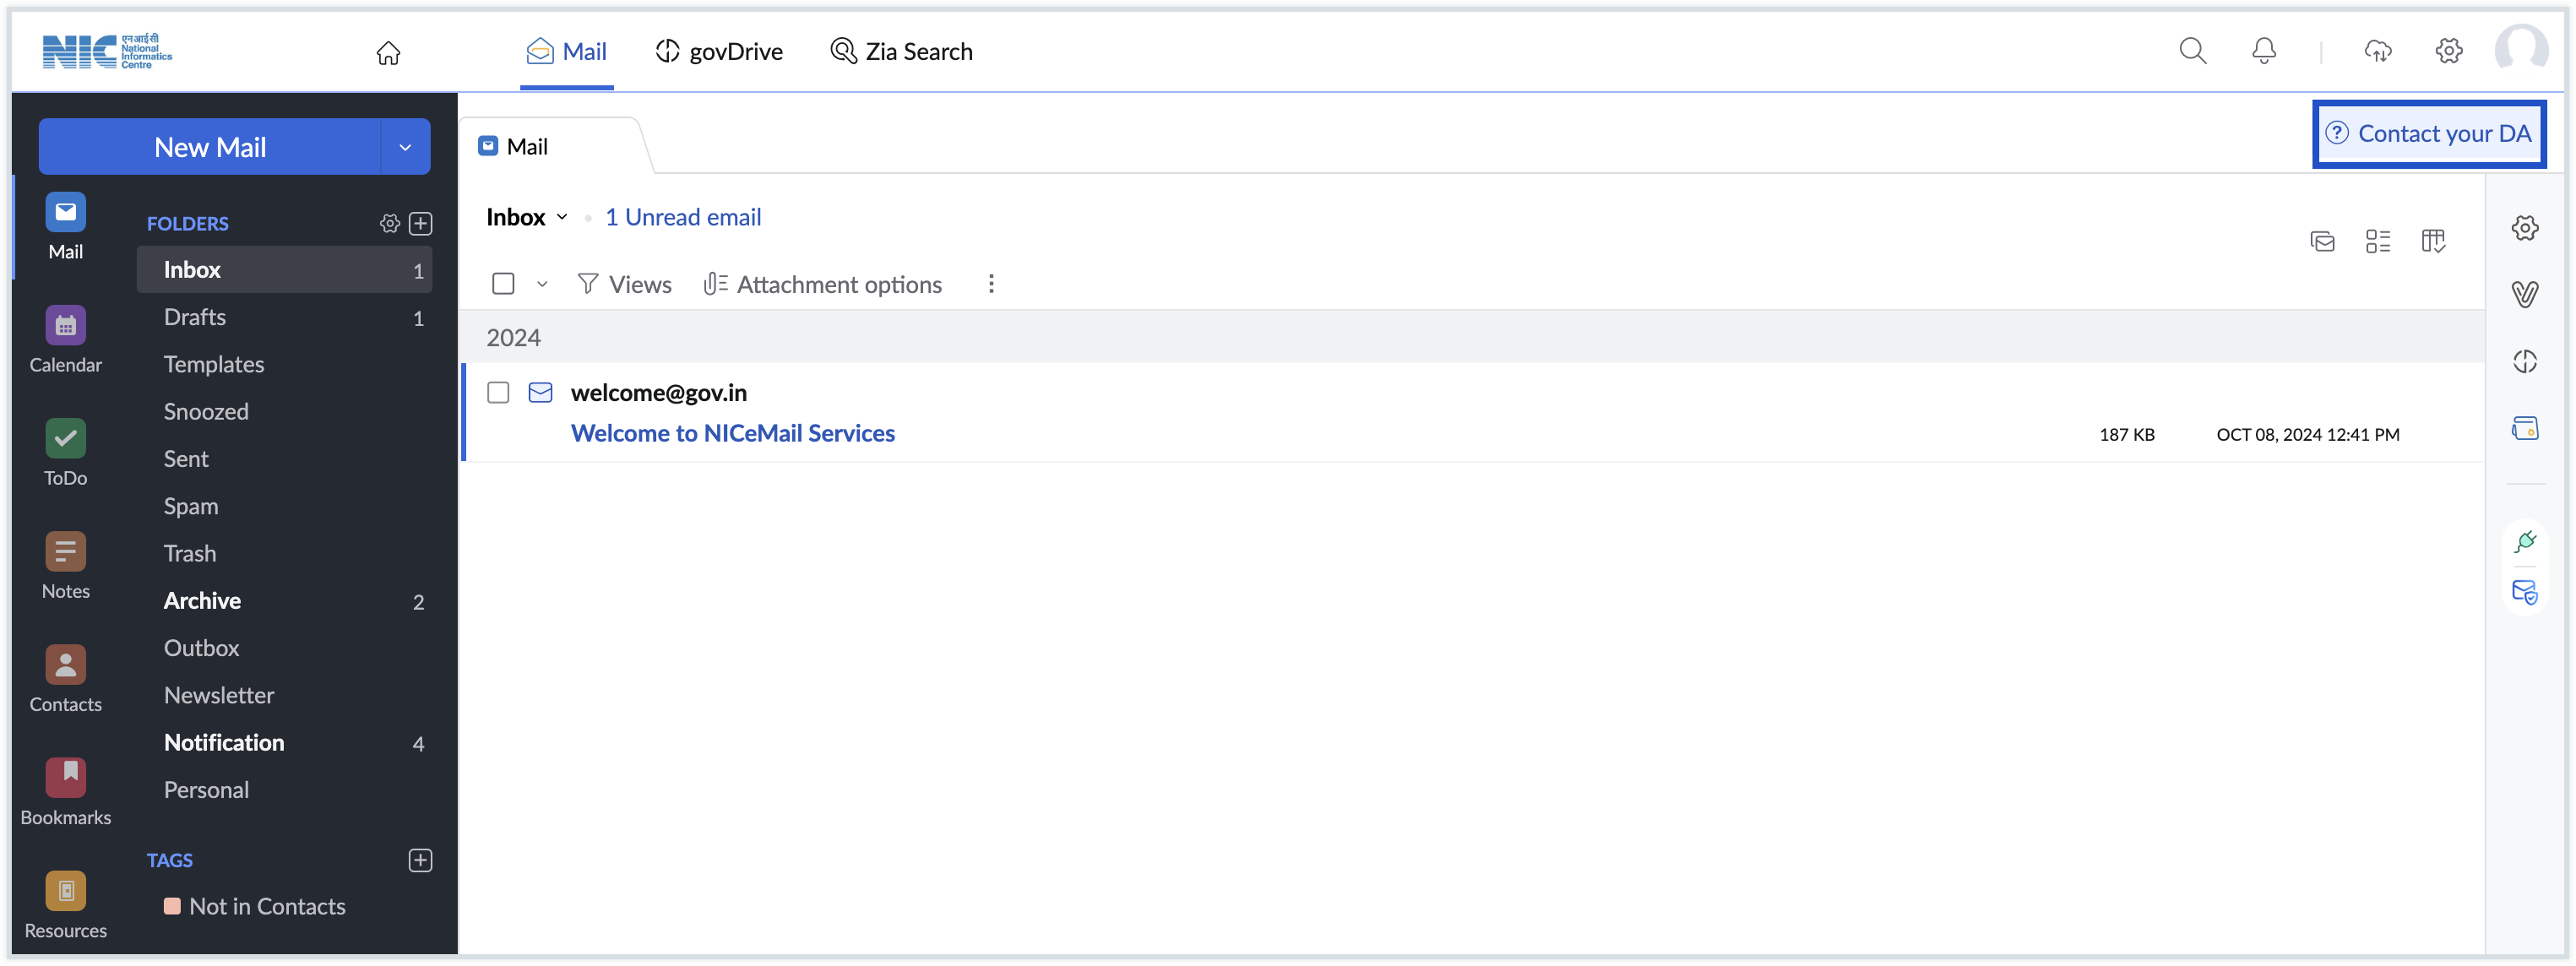
- A list of your department’s Delegated Administrators will appear along with their contact details.
- Click the Copy icon to copy an email address or the Send an email icon to draft an email directly to a DA.
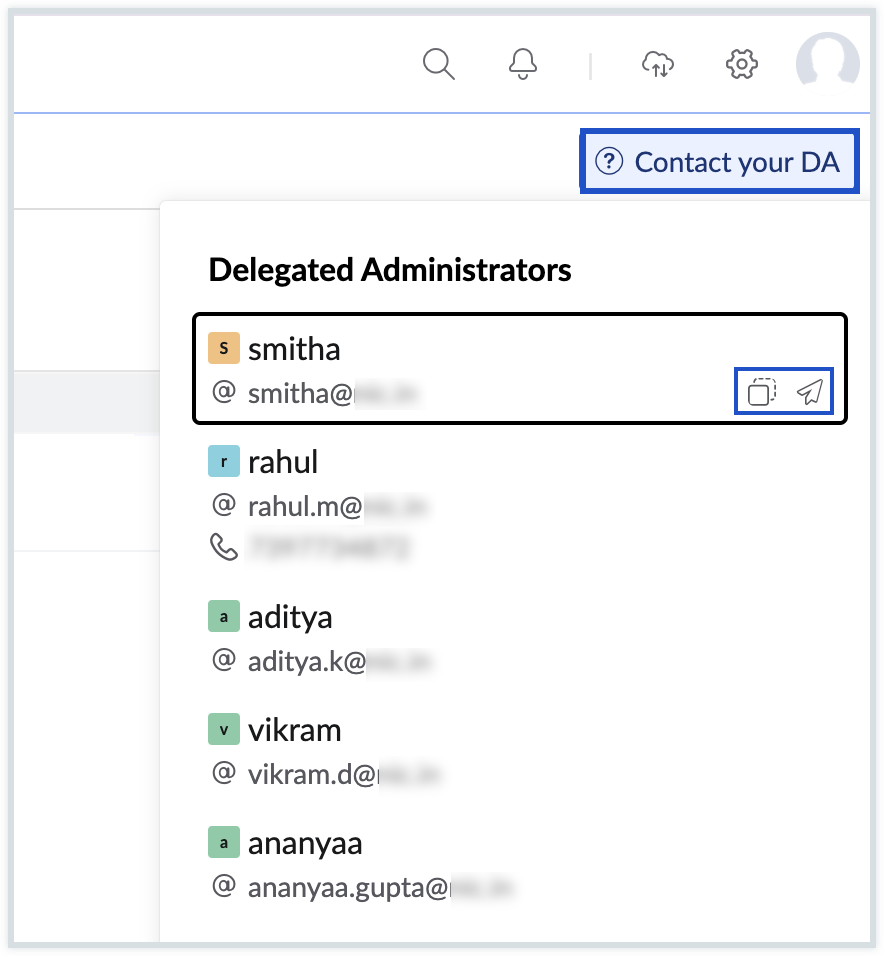
By following these steps, you can quickly find the Delegated Administrator for your department and proceed with any required account updates. If you need further assistance, please contact NICeMail Services Help Desk.
Help Desk Contact Details
If you have any queries related to the migration of your account, data migrated to your account, or issues related to the use of the email solution, you can reach out to our Help Desk team available 24x7x365 to assist you with a quick resolution.
The contact details are given below:
- Help Desk Email Address: helpdesk-email@gov.in
- Help Desk Toll-Free Number: 18005719646 (24X7)
